Latest

Interior Design Course And Course Fees In Goa For The Year 2022

Interior Design Course fees in Goa (year 2022-2023)


Diploma In Interior Design (6 Month Duration) Fees Details

The Diploma in Interior Design Course is best Suited for Beginners, Who want to Learn the Basics of Interior Design and Concepts. The Complete Course fees of Rs 14000, can be paid in two Equal Instalment of Rs 7000 each. Please see the Details below 
 
1St Installment
  • 7000/- To Be Paid During The Time Of Admission
2nd Installment
  • 7000/- To Be Paid After 2 Months Of Admission

Diploma In Interior Design Course Fees in Goa India


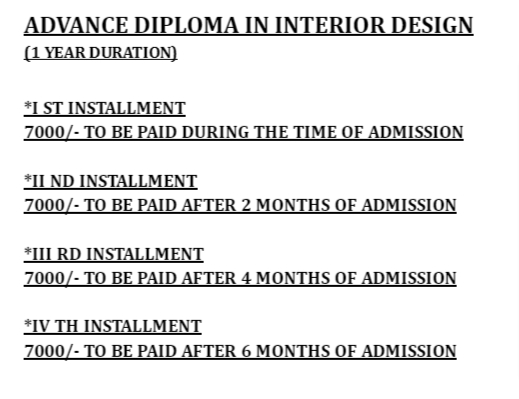
Advance Diploma In Interior Design (1 Year Duration) Fees Details:

The Advanced Diploma is Complete 1 Year Course and the Students can Pay their Course fees for in in 4 equal Instalments

1St Installment
  • 7000/- To Be Paid During The Time Of Admission
2nd Installment
  • 7000/- To Be Paid After 2 Months Of Admission
3Rd Installment
  • 7000/- To Be Paid After 4 Months Of Admission
4th Installment
  • 7000/- To Be Paid After 6 Months Of Admission
Advance Diploma In Interior Design Course Fees in Goa India

The Best Computer Courses You can Learn after 10th or 12th

With more than 20 years of Experience in Computer and related Subjects , We have faced with regular questions like : 

  • What are the Computer Courses one can Do after 12th ? or After 10th ?
  • Which Computer Courses are best for beginners? 
  • What are the Computer Courses that can get you a Job?
  • Which are the Computer Courses you Recommend for Government Job?
  • What are the Basic Computer Courses in Demand that I should Learn?
  • What are the Course Fees for the Basic Computer Courses

The Above List of Questions ate Some of Many that we are trying to Answer here. 

Read the Complete Article to get a glimpse of What type of Computer Courses are in Demand and who can do these Courses with Course fees for the Year 2021.

Who Needs to Learn About Computers ?

Computer Courses are equally great for Kids, Adults and for Seniors. 

In India , most of the busy Cities , township had one or more Computer Institutes , which educate People from all walks of Life to Lenr the Basics of Computers to the Advanced Tips and Tricks.

Now a Days Online Computer Courses are Available with the regular Classroom based Computer Training Courses.

Student Learning Computers at Institute India after 12th

As per the current Scenario , after Corona Pandemic, the use of Digital Media increases many fold. Students get Online Classroom , Office Works are distributed to workforce sitting miles aways. 

This is all possible due to the Computer Infrastructure nd Acceptance of Digital Technology. 

It Requires lots of human resources like Computer Operators, Data Entry Professionals, Content creators, Designers, Advertising Professionals, Medical Students, Doctors, Engineers, Interior Designers, Architects, Teachers, Businessman, Politicians, Bankers, Farmers, Travel Agencies, Corporates, Shopping Malls, Retail Outlets, Sports persons. Coaches, Travel Guides, Tourism Departments , Scientists, Musicians, Dance Academy , Contractors, Builders, Security Agencies, Hospitals, Clinics etc.

All needs some education based on Basics of Computers at least. 

So We think Computers are now the Integral Part of Human Society and One must have a Basic Knowledge of it , which can be achieved by Completing a Basic Computers Course .

Many Called it Diploma in Computer Application , and Some just the Basic Computer Course. Whatever be the Name , It only matters , if you can utilize your Learning in Real Life. 

So You can Learn Computers from Standard 2/ Class 2 or After 10th Class, Or after  12th Class or during the College life.

What are the Best Courses Available in India for Computer Learning ?

Honestly there are many Courses , which one can pursue to learn Computers. Most Popular Courses are

DCA (Diploma in Computers) - Check the DCA Syllabus here  (https://www.cadcamcentregoa.com/2019/04/diploma-in-computer-application-dca.html)

DTP ( Diploma in DESK-TOP PUBLICATION) Which Includes Photo Editing Courses like COREL DRAW, PHOTOSHOP and PAGE MAKER)

See DTP Syllabus here 

Accounting Computers Courses like - Certificate in Tally 

See Complete Certificate in Tally Syllabus here

Diploma in Interior Design : For Architects , Interior Designers and Can be done by Students after 12th Class. : See the Syllabus of Diploma in Interior Design here 

AutoCAD Courses : This is a great Course for many of the Students , after School and College. This Course is in Very High Demand , due to its usage, implementation in Many types of Business and Proffesions. ( Check out Who can do AutoCAD Courses ?)

Checkout the AutoCAD Course Fees (for the year 2021) here 

One can Register Online here for the AutoCAD Courses in Goa .

What is the Course fees for DCA, Tally and DTP in India ? (2021)

While the Courses and its fees are Available in Wide range of Pricing , 

We can Assure you of best Computer Courses at most Affordable and Best Prices. 

You can Checkout the Detail Course Fees List below at the CAD CAM CENTRE,Goa for the Year 2021

Computer Course Fees Goa India (DTP, DCA, TALLY) for the year 2021

CAD CAM CENTRE is Registered Under Govt. of India with Educational ISO 29990:2010 Certification.

Diploma in COMPUTER APPLICATION(DCA): Course fees is Rs. 4000 for the Classroom Training, Rs 3000 for Online Training and Rs. 500 for the Exam Fees. 

Diploma in DESK-TOP PUBLICATION(DTP)  Which Includes COREL DRAW+PHOTOSHOP+PAGE MAKER) : Course fees is in two Installments of Rs. 3000 each  for the Classroom Training as well as for Online Training and Rs.500 for the Exam Fees

Certificate in TALLY : Course fees is Rs. 4000 for the Classroom Training, Rs 3000 for Online Training and Rs. 500 for the Exam Fees.

What is the Course Fees for Diploma in interior design in India ?

At our Institute We have Two Courses on Diploma in interior design.

One is Diploma in interior design (6 month Course) and the Other is Advanced Diploma in interior design(1 year Course)

Interior Design Course Diploma India

The Course Fees for Diploma in interior design 2022 - 2023 :

1) Diploma in interior design six months course (4 months of classes and 2 months of apprenticeship ) 

  • Total course fees is 14000/- to be paid in two installments of 7000/- each.

2) Advance Diploma in interior design one year course (8 months of classes and 4 months of apprenticeship)

  • Total course fees is 28000/- to be paid in four installments of 7000/- each .

With the Year 2021, AutoCAD Training and Courses see more and more students registration Online. There are Reasons like , affordable Course fees, Job openings in Interior Design and Architecture.

AutoCAD Course is in great Demand after the Pandemic year of Corona. Now its the year 2021 and the Indian Economy is growing Fast . To Pace the growing demands The Course fees remains intact and are at very affordable.

NOTE : We suggest all Doing AutoCAD Courses to engage themselves in implementing their learnings into practical use cases, like Designing a Modular Kitchen , A Apartment Design, A Office Desktop Table design, A Balcony Design etc. for your own of For someone you know. This exercise will help you in experiencing best real world scenario. 

Here are the List of Courses , we Provide to our Students , with up to date information on Course Details as well as fees.  To Join the Course One has to Register First online in the Website here, and then proceed for Admission to specific Course. These Course fees are limited to the Seat Availability 
AutoCad Course Fees Chart Table with Description for Students in Goa

AutoCAD Course Fees Details :

Course Fee of AutoCAD Depends on Following Factors :

    Autocad Course Fees in Goa , India Starts At INR 2999 only
  1. Brand name of the training centre.
  2. Syllabus covered by the trainer or the institution.
  3. Years of industrial experience and knowledge of the trainer.
  4. Time duration of course or the flexibility given on time for the students.
  5. Valid certification from an AutoDesk authorized training center on completion of course.
  6. Individual with personal attention or in group training's given by the institute.
  7. Job assurance or placement if given by the institute.
  8. Infrastructure of the institution.

AutoCAD Practical Training in GOA with Course fees


AutoCAD course fees in GOA is divided into different packages depending on syllabus covered. AutoCAD Course is an Essential part of  Diploma in Civil Design Syllabus

 The Complete Course Details including the Fees in CAD Center is segregated to different Packages.
  • BASIC AutoCAD Course Fee : The Basic AutoCAD Course includes PLANS and it starts with Rs 1999/- only
  • AutoCAD 2D Course : This Course Includes AutoCAD Plans as well as 2D Designing and the Fees is Rs 2999/-
  • AutoCAD 3D Course : This Course Includes AutoCAD Models as well as 3D Designing and the Fees is Rs 2999/-
  • AutoCAD Course Fee : AutoCAD course fees which covers the entire syllabus as per Autodesk syllabus is 4999/-only,with this courses student can apply for Autodesk certified professional exam.
  • Autocad advance course fees is  5998/-which can be paid in two installments of 2999/-each.This includes creation of house models,Applying of materials using material editor,walk-through videos,render images,interior designing,making of curtain ,bed,pillow and other interiors etc in 3D. 
CAD CAM CENTRE, MARGAO. GOA (https://www.cadcamcentregoa.com)
at #11 ,M.N.F heights, Above Paulo Travels, Opp K.F.C,Near Ktc Bus Stand, Margao, Goa
Call : 09762288832 .Email : cadcamcentregoa@gmail.co
Course CodeCourse Name Description Of CourseCourse Fees
AC001Basic AutoCAD CourseThis Course Includes AutoCAD Plans₹1,999
AC002AutoCAD 2D CourseThis Course Includes AutoCAD Plans as well as 2D Designing₹2,999
AC003AutoCAD 3D CourseThis Course Includes AutoCAD Models as well as 3D Designing₹2,999
AC004Autodesk Syllabus After Completing this course, students can apply for Autodesk certified professional exam₹4,999
AC005Autocad advance courseThis includes creation of house models,Applying of materials using material editor,walk-through videos,render images,interior designing,making of curtain ,bed,pillow and other interiors etc in 3D₹5,999


Notable Points to Remember :
  • Certification charges additional.
  • All fees mentioned above is of individual training. For Group / Corporate training's Discounts you can Contact at the CAD CAM Center. Click here for Contact
The Year 2024 is a career best year for Students in Commerce and Arts. The economy is booming from Retail Sector to Manufacturing. 

Students who passed out from the School and Colleges have to Learn the best Skills that is Job guaranteed and in high Demand.

TallyPrime is one of the many best Courses that a student should Learn in India, Specially in Goa to be ready to get the most demanded Job of an Tally Accountant.

Checkout the Course Syllabus as well as Many Job Opportunities for the Year 2024, for aspiring Students. 

Best Training Institute Course to Learn Tally Prime in Goa

Complete Course Fees after 10th and 12 th in Goa


Complete Course Outline in Tally: 


Tally Prime Training Course Details

1.1 INTRODUCTION TO TALLY ERP 9
1.2 SALIENT FEATURES OF TALLY
1.3 ACCOUNTING FEATURES OF TALLY
1.4 ENHANCEMENTS IN TALLY .ERP 91.4.1 GENERAL ENHANCEMENTS
1.4.2 FUNCTIONAL ENHANCEMENTS
1.5 HARDWARE REQUIREMENT FOR TALLY 9
1.6 OPENING OF TALLY .ERP 9
1.7 COMPONENTS OF TALLY ERP 9
1.8 CREAT A COMPANY
1.9 SELECT COMPANY
1.10 SHUT A COMPANY
1.11 ALTER A COMPANY
1.12 DELETE A COMPANY

Tally ERP Course Training in Goa Institute 2. STOCK & GODOWN

2.1 INTRODUCTION TO STOCK GROUP
2.1.1 CREATING A SINGLE STOCK GROUP
2.1.2 DISPLAYING SINGLE STOCK GROUP
2.1.3 DISPLAYING MULTIPLE STOCK GROUP
2.1.4 ALTERING A SINGLE STOCK GROUP
2.1.5 ALTERING MULTIPLE STOCK GROUP
2.2 INTRODUCTION TO STOCK CATEGORIES
2.2.1 ENABLING STOCK CATEGORIES
2.2.2 CREATING A SINGLE STOCK CATEGORIES
2.2.3 CREATING MULTIPLE STOCK CATEGORIES
2.2.4 DISPLAYING A SINGLE STOCK CATEGORIES
2.2.5 DISPLAYING A MULTIPLE STOCK CATEGORIES
2.2.6 ALTERING A SINGLE STOCK CATEGORIES
2.2.7 ALTERING A MULTIPLE STOCK CATEGORIES
2.3 INTRODUCTION TO STOCK ITEM
2.3.1 CREATING A SINGLE STOCK ITEN
2.3.2 CREATING MULTIPLE STOCK ITEM
2.3.3 DISPLAYING A SINGLE STOCK ITEM
2.3.4 DISPLAYING A MULTIPLE STOCK ITEM
2.3.5 ALTERING A SINGLE STOCK ITEM
2.3.6 ALTERING A MULTIPLE STOCK ITEM
2.4 UNIT OF MEASUREMENT
2.4.1 CREATING SINGLE UNIT OF MEASUREMENT
2.4.2 CREATING COMPOUND UNITS OF MEASUREMENTS
2.4.3 DISPLAYING A UNITS OF MEASUREMENTS
2.4.4 ALTERING A UNIT OF MEASUREMENTS
2.5 INTRODUCTION TO GODOWNS
2.5.1 CREATING A SINGLE GODOWN (NORMAL MODE)
2.5.2 CREATING A SINGLE SODOWN (ADVANCE MODE)
2.5.3 CREATING MULTIPLE GODOWNS
2.5.4 DISPLAYING STOCK GODOWNS
2.5.5 ALTERING STOCK GODOWN

3. GROUP, LEDGER, VOUCHER, ORDER, INVOICE

3.1 INTRODUCTION TO GROUPS
3.1.1 CREATING A GROUP
3.1.1.1 CREATING A SINGLE GROUP
3.1.1.2 CREATING MULTIPLE GROUP
3.1.2 DISPLAYING A GROUP
3.1.2.1 DISPLAYING A SINGLE GROUP
3.1.2.2 DISPLAYING MULTIPLE GROUP
3.1.3 ALTERING GROUPS
3.1.3.1 ALTERING A SINGLE GROUP
3.1.3.2 ALTERING A MULTIPLE GROUP
3.1.3.3 DELETING A GROUP
3.2 INTRODUCTION TO LEDGERS
3.2.1 CREATING A LEDGER
3.2.1.1 CREATING A SINGLE LEDGER
3.2.1.2 CREATING A MULTIPLE LEDGER
3.2.2 DISPLAYING /ALTERNATING A LADGER CCOUNT
3.2.3 DELECTION OF A LEDGER ACCOUNT
3.3 INTRODUCTION TO VOUCHER TYPE
3.3.1 CREATING A VOUCHER TYPE
3.3.2 DISPLAYING AVOUCHER TYPE
3.3.3 ALTERNATING A VOUCHER TYPE
3.3.4 CREATING ACCOUNTING VOUCHER
3.3.5 CREATING AN INVENTORY VOUCHER
3.4 INTRODUCTION TO PURCHASE ORDERS
3.4.1 ELABLING ORDER PROCESSING
3.4.2 CREATING A PURCHASE ORDER
3.4.3 ALTERNATING A PURCHASE ODER
3.4.4 DELECTING A PURCHASE ORDER
3.5 INTRODUCTION TO SALES ORDERS
3.5.1 CREATING A SALES ORDER
3.5.2 ALTERNATING A SALES ORDER
3.5.3 DELECTING A SALSE ORDER
3.6 INTRODUCTION TO INVOICES
3.6.1 ELABLE ALLOW INVOICING? OPTION
3.6.2 CREATING AN INVOICE ENTRY
3.6.3 SETTING INVOICE / ORDERS ENTRY
3.6.4 CONFIGURE INVOICE PRINTING
3.6.5 PRINTING INVOICE / VOUCHER

4. REPORTS IN THE TALLY.ERP 9

4.1 BASIC FEATURES OF DISPLAYING REPORTS
4.2 WORKING WITH BALANCE SHEET
4.2.1 SCHEDULE VI BALANCE SHEET
4.2.2 BUTTON OPTION IN SECDULE VI BALANCE SHEET
4.2.3 CONFIGURING THE BALANCE SHEET
4.2.4 ADDING A NEW COLUMN IN A BALANCE SHEET
4.2.5 ALTERNATING FROM A COLUMN IN A BALANCE SHEET
4.2.6 DELECTING A COLUMN FROM A BALANCE SHEET
4.2.7 DISPLYING A HALF YEARLY BALANCE SHEET
4.3 WORKING WITH PROFIT & LOSS ACCOUNT
4.3.2 SCHEDULE VI PROFIT & LOSS ACCOUNT
4.3.2 BUTTON OPTION IN SECDULE VI PROFIT & LOSS ACCOUNT
4.3.3 CONFIGURING PROFIT & LOSS ACCOUNT
4.3.4 ADDING A NEW COLUMN IN A PROFIT & LOSS ACCOUNT
4.3.5 ALTERNATING A COLUMN FROM A BALANCE SHEET
4.3.6 DELECTING A COLUMN FROM A BALANCE SHEET
4.4 INCOME/EXPENSE STATEMENT INSTEND OF P&L?
4.5 WORKING WITH STOCKS SUMMARY REPORT
4.5.1 CONFIGURATION IN TRIAL BALANCE
4.6 WORKING WITH RATIO ANALYSIS
4.7 WORKING WITH TRIAL BALANCE
4.7.1 F12: CONFIGURATION IN TRIAL BALANCE
4.8 WORKING WITH DAY BOOK
4.8.1 DISPLAYING A DAY BOOK REPORT FOR A PARTICULAR VOUCHER
4.8.2 DISPLAYING THE DAY BOOK IN DETAILED VIEW
4.8.3 CONFUGRATION OF DAY BOOK REPORT

5. PAYROLL IN TALLY.ERP 9

5.1 INTRODUCTION TO PAYROLL
5.1.1 FEATURE OF TALLY ERP 9 PAYROLL
5.1.2 ENABLING PAYROLL IN TALLY. ERP 9
5.2 INTRODUCTION TO EMPLOYEE CATEGORIES
5.2.1 CREATEING SINGLE EMPLOYEE CATEGORIES
5.2.2 CREATEING MULTIPLE EMPLOYEE CATEGORIES
5.3 INTRODUCTION TO EMPLOYEE GROUPS
5.3.1 CREATEING SINGLE EMPLOYEE GROUPS
5.2.2 CREATEING MULTIPLE EMPLOYEE GROUPS
5.4 INTRODUCTION TO EMPLOYEES
5.4.1 CREATEING SINGLE EMPLOYEE
5.4.2 CREATEING MULTIPLE EMPLOYE
5.5 INTRODUCTION TO PAYROLL UNIT
5.5.1 CREATEING PAYROLL SINGLE UNIT
5.5.2 CREATEING PAYROLL COMPOUND UNIT
5.6 INTRODUCTION TO ATTENDENCE / PRODUCTION TYPES
5.6.1 CREATEING ATTENDANCE TYPE
5.6.2 CREATEING PRODUCTION TYPE
5.6.3 CREATING USER DEFINED CALENDAR TYPES
5.7 INTRODUCTION TO PAY HEADS
5.7.1 PAY HEAD TYPES
5.7.2 CREATING A PAY HEAD
5.8 PAYROLL VOUCHER ENTRY/ TRANSACTIONS
5.8.1 CREATEING ATTENDANCE / PRODUCTION VOUCHER
5.8.1.1 ATTENDENCE VOUCHER – MANUAL ENTRY
5.8.1.2 ATTENDENCE VOUCHER USING AUTO AUTO FILL
5.8.2 CREATEING PAYROLL VOUCHERS
5.8.2.1 USER DEFINED PAY HEAD PROCESS
5.8.2.2 SALARY PROCESS
5.8.2.3 PF PROCESS
5.8.2.4 ESI PROCESS
5.8.2.5 EMPLOYER PF ADMIN CHANGES PROCESSING
5.9 INTRODUCTION PAYROLL REPOTRS
5.9.1 STATEMENTS OF PAYROLL
5.9.1.1 PAY SLIP
5.9.1.2 PAY SHEET
5.9.1.3 PAYROLL STATEMENT
5.9.2 ATTENDANCE REPORTS
5.9.2.1 ATTENDANCE SHEET
5.932.2 ATTENDANCE REGISTER
5.9.3 EXPAT REPORTS
5.9.3.1 PASSPORT EXPIRY REPORT
5.9.3.3 CONTRACTEXPRIY REPOTS
5.9.4 PAYROLL STATUTORY REPORTS

6.TAXATION

6.1 INTRODUCTION TO SERVICE TAX
6.1.1 SERVICE TAX FEATURES IN TALLY.ERP9
6.1.2 ENABLING SERVICE TAX IN TALLY.ERP9
6.1.3 CREATING A SERVICE PURCHASE LEDGER
6.1.4 CREATING A SERVICE SALES LEDGER
6.1.5 CREATING A SERVICE PROVIDER (SUPPLIER) LEDGER
6.1.6 CREATING A SERVICE RECEIVER (CUSTOMER) LEDGER
6.1.7 SERVICE TAX REPORTS
6.2 TAX COLLECTED AT SOURCE (TCS)
6.2.1 FEATURES OF TCS IN TALLY.ERP 9
6.2.2 ENABLING TCS IN TALLY.ERP 9
6.2.4 CREATING SALES LEDGER AND OUTPUT VAT LEDGER
6.2.5 CREATING TCS LEADGER
6.2.6 CREATING A STOCK ITEM
6.2.7 TCS REPORTS
6.3 TAX DEDUCTED AT SOURCE (TDS)
6.3.2 CREATING A EXPENSE LEDGER
6.3.3 CREATING A PARTY LEDGER
6.3.4 CREATING A TAX LEDGER
6.3.5 TDS REPORTS
6.4 VALUE ADDED TAX (VAT)
6.4.1 VAT IN INDIA
6.4.2 GENERAL TERMINOLOGIES OF VAT
6.4.3 ENABLING REGULAR VAT IN TALLY.ERP 9
6.4.4 ENABLING COMPOSITE VAT IN TALLY.ERP 9
6.5 GOEODS AND SERVICE TAX (GTS)
6.5.1 ACTIVATING GST FOR YOUR COMPANY
6.5.2 DEACTIVATING VAT, EXCISE SND SERVICE TAX FEATURES
6.5.3 SETTING UP GST RATES
6.5.4 CREATING PURCHASE AND SALES LEDGER
6.5.5 CREATING A TAX LEDGER
6.5.6 REATING A EXPENSE LEDGER
6.5.7 CREATING A PARTY LEDGER
6.5.8 CREATING A STOCK ITEM
6.5.9 CREATING A PURCHES VOUCHER
6.5.10 CREATING A EXTEMPT PERCHES VOUCHER
6.5.11 CREATING A SALES VOUCHER
6.5.12 GST REPORTS

7. INTRODUCTION TO TALLY. NET

7.1 INTRODUCTION TO TALLY.NET
7.2 TALLY.NET FEATURES
7.3 CONFIGURE & CONNECT TO TALLY. NET
7.4 CREATE TALLY.NET USERS
7.5 REMOTE LOGIN
7.6 CREATE SECURITY CONTROLS FOR TALLY.NET USERS
7.7 AUTHORISE TALLY.NET USERS

8. IMPORTANT FEATURES OF TALLY. ERP 9

8.1 TALLY.ERP 9 FEATURES
8.2 BACKUP IN TALLY ERP 9
8.3 RESTIRING BACKUP
8.4 SPLIT COMPANY DATA
8.5 VERIFY SPLIT DATA
8.6 EXPORTING DATA
8.7 EXPORTING FORMATES
8.8 EXPORTING DATA FORM MASTER
8.9 IMPORTING DATA
8.10 IMPORTING FORMATS
8.11 IMPORTING MASTERS
8.12 IMPORTING VOUCHERS
8.13 E-MAIL REPORT
8.14 SECURITY CONTROL IN TALLY ERP 9
8.15 ENABLE SECURITY CONTROL FOR A COMPANY ( ADMINISTRATOR LOGIN)
8.16 DISABLE SECURITY CONTROL
8.17 CREATE SECURITY LEVELS

9. SHORTCUT KEYS OF TALLY.ERP 9

9.1 FUNCTION KEY COMBINATION
9.2 SPECIAL KEY COMBINATION
9.3 SPECIAL FUNCTION KEY COMBINATION
9.4 KEY COMBINATION USED FOR NAVIGATION

DIPLOMA IN COMPUTER APPLICATION(DCA) 6 MONTHS

DCA Computer Training Course in Goa Institute
Part I:  MS Word
Chapter 1: Word, a Word Processor
4.1 Welcome to Microsoft Office
4.2 Welcome to Word
4.3 Our First Document
4.4 Saving a Document
4.5 Creating a new Document
4.6 Creating a backup Copy
4.7 Dialog Box Save As Revisited
4.8 Shutting Down Word
4.9 Opening a Existing Document
4.10 Creating Templates
4.11 Handling Multiple Documents
4.12 Various Views
4.13 Home-Pane
4.13.1 Clipboard-Group
4.13.2 Front-Group
4.13.3 Paragraph- Group
4.13.4 Styles-Group
4.13.5 Editing Group
4.14 Getting Help
4.15 Preparing a Suitable Document
4.16 Dialog Box Word options and Auto Corrections
4.17 Spelling and Grammar Corrections
4.18 Navigating Keyboard Cursor
4.19 Selecting Text
4.20 Formatting Text
4.21 Setting Font and Font size Using Home-Pane
4.22 Using Bold, Italic and Underline tools
4.23 Using the Dialog Box Front
4.24 Character level and Paragraph level Formatting

Chapter 2: Mastering Word

5.1 Live Preview
5.2 Customizing Quick Access Toolbar
5.3 Bullets and Numbering
5.4 Creating a Table: User-Default Tab Setting
5.5 Creating a Table: User Defined Tab Setting
5.5.1 Using the Tab Selection –Bottom
5.5.2 Setting Tab Stops and Typing Data for Table
5.6 Using the Dialog Box Tabs
5.7 Cut, Copy and Past
5.8 Zooming in and zooming out
5.9 Subscripts and Superscripts
5.10 Inserting Symbols
5.11 Status Bar
5.12 Inserting and Removing Page Numbers
5.13 Drop Cap
5.14 Using Hyphenation
5.15 Seating a page
5.16 Paragraph Formatting
5.16.1 Alignments and Indentation Using the Tools
5.16.2 Line Spacing
5.16.3 Spacing Between paragraph
5.16.4 Indentation Using the Dialog Box paragraph
5.16.5 Formatting Complete Document
5.17 Adding Footnotes and Endnotes
5.18 Adding and Deleting Header and Footer
5.19 Be Stylish
5.20 Printing a Document
5.21 Remote Printing without Using Print files
5.22 Remote Printing Using Print Files
5.23 Welcome to word
5.23.1 Opening Screen of word
5.23.2 Our first Document and Knowing the Task-panes
5.23.3 Savings a Document
5.23.4 Creating a New Documents
5.23.5 Standers tools Bars and Formatting Toolbar
5.23.6 Creating Backup Copy
5.23.7 Shutting Down Word
5.23.8 Opening and Exiting Document
5.23.9 Nuts and Bolts of word
5.23.10 Getting help
5.23.11 changing the face office Assistant

Part II: MS Excel

Chapter 3: Excel a Spreadsheet Application

6.1 Welcome to Excel
6.2 Creating a First Workbook
6.2.1 Opening Screen of Excel
6.2.2 Component of Workbook
6.2.3 Typing data in a Worksheet
6.2.4 Edition Data and formula- Bar
6.2.5 Saving a Workbook
6.2.6 Creating a Backup Copy
6.2.7 Shutting Down Excel
6.3 Home Page
6.3.1 Clipboard- Group
6.3.2 Front –Group
6.3.3 Alignment-Group
6.3.4 Number-Group
6.3.5 Styles- Group
6.3.6 Cells- Group
6.3.7 Editing-Group
6.4 Navigating Selector
6.5 Creating a new Workbook
6.6 Opening and Existing Workbook
6.7 Selecting Multiple Workbook
6.8 AutoFill
6.9 Getting Help
6.10 Handling Multiple Workbook
6.11 Working with Worksheet
6.11.1 Renaming a Worksheet
6.11.2 Inserting a new Worksheet
6.11.3 Deleting a Worksheet
6.11.4 Moving or Coping Worksheet
6.11.5 Using Sheet-Tab-Scroll-Buttons and Tab-Split box
6.12 Cut, copy and Paste
6.13 Resizing Rows and Column
6.14 Installed Templates

Chapter 4: More Adventure with Excel

7.1 Entering Test, Numbers, and Dates
7.2 Inserting and Removing Cells, Rows, and Column
7.2.1 Inserting and Removing Cells, Rows, and Column
7.2.2 Deleting Cells, Rows, and Columns
7.3 Merging Cells
7.4 Formatting Sells and Tables
7.5 Creating Charts
7.6 Using Formulae
7.6.1 Typing a Formula in a cell
7.6.2 Entering a Formula in cell Using Copy and Paste Method
7.6.3 Entering a Formula in a cell Using AutoFill
7.6.4 How to Edit a Formula
7.6.5 How to Create a Formula
7.6.6 Relative Addressing and Absolute Addressing
7.6.7 Coping Values Instead of Formula
7.7 Using Functions
7.8 Printing Small Worksheet
7.9 Printing Large Worksheet
7.10 Creating a Database
7.11 Welcome to Excel
7.11.1 Creating a First Workbook
7.11.2 Editing Data and Formula-Bar
7.11.3 Saving and Workbook
7.11.4 Creating a Backup Copy
7.11.5 Shutting Down Excel
7.11.6 Standard toolbar and Formatting Toolbar
7.11.7 Creating a new Workbook
7.11.8 Opening and Existing Workbook
7.11.9 Nuts and Bolts of Excel

Part II: MS PowerPoint

Chapter 5: PowerPoint a Presentation Application

9.1 Welcome to PowerPoint
9.2 Opening Screen of PowerPoint
9.3 Creating a Presentation Using a Templates
9.4 Saving a Presentation
9.5 Slide Show at Home
9.6 Using View Buttons
9.7 Slide Show at Seminar Side
9.8 Opening and Existing Presentation
9.9 Creating a Presentation Using word Documents
9.10 Using Home-Pane
9.11 Adding Design to a Presentation
9.12 Adding Animation to a Presentation
9.13 Adding Sound to a Presentation
9.14 Working with Sides
9.14.1 Adding a New Sides
9.14.2 Deleting a Sides
9.14.3 Placing a Text Box on a Sides
9.14.4 Placing a Picture on a Sides
9.14.5 Placing a Clip Art on a Side
9.14.6 Placing a Video Clip on a Sides
9.15 Creating a Presentation from Scratch
9.15.1 Opening a Blank Presentation
9.15.2 Adding Footer to a Slide
9.15.3 Developing a Presentation
9.16 Welcome to PowerPoint
9.16.1 Opening Screen of PowerPoint
9.16.2 Multiple ways Of Creating Presentation
9.16.3 Creating a Presentation Using word Documents
9.16.4 Saving a Presentation
9.16.5 Using Design Temple
9.16.6 Slide Show
9.16.7 Shutting Down PowerPoint
9.16.8 Opening and Existing Presentation
9.16.9 Nuts and Bolts of PowerPoint

DIPLOMA IN DESKTOP PUBLICATION (DTP) 6 MONTH

Desktop Publishing DTP Course Training in Goa Institute

Chapter 1: Welcome to Desktop Publishing

Part I – Introduction

Why Learn Desktop Publishing (DTP)?
What is DTP?
Letterpress Printing
Wooden Types and Metal Types
Hot Metal Types
Printing Photographs
Lithography and Offset Printing
Gravure
Hardware Requirement
Software Requirement
DTP Operators Arsenal
1.1.8 Text Editors
1.8.2 Word Processors
1.8.3 Vector Illustration Applications or Drawing Applications
1.8.4 Bitmap Image Editing Application
1.8.5 Page Layout Applications
1.9 Scanning
1.10 Printing
1.11 Monitor
1.12 Input and Output Device, and Storage
1.13 Vector Graphics and Raster Graphics
1.14 Fronts
1.14.1 Front Styles
1.14.2 Serif and Sans Serifs
1.14.3 Dimension of Front
1.14.4 Fixed Pitch Front and Proportional Spaced Front
1.14.5 Scaling, Tracking, Kerning, Leading and Ligatures
1.14.6 Fronts in your computer
1.14.7 Vectors Fronts (or outline fronts) and Bitmapped Fronts
1.15 Character level and paragraph level Formatting
1.16 Drop Caps
1.17 Hyphenation
1.18 Alignments
1.19 Indentation
1.20 Single sided and double sided Documents
1.21 Headers and Footers
1.22 Footnotes and Endnotes
1.23 Using the Mouse
1.24 Using the keyboard
1.25 Selecting the Text and Graphics
1.26 Cut, copy, paste and clipboard
1.27 Graphics File Formats
1.28 Half-tone Image
1.29 Screen colors (RGB) and Printer colors (CMYK)
1.30 Sports colors and process colors
1.31 colors separation
1.32 coleus half –tone Image
1.33 Generic process in Desktop publishing

Part II: CorelDraw 10

Chapter 2: The Fascinating CorelDraw 10

2.1 Welcome to CorelDraw 10
2.1.1 Starting CorelDraw 10
2.1.2 Creating the very fast Drawing
2.1.3 Saving the Drawing
2.1.4 Closing the Drawing and shutting Down CorelDraw 10
2.2 Opening and Exiting Drawing
2.3 The dialog Box Open Drawing
2.4 Status Bar
2.5 Cartesian Coordinates
2.6 The property Bar
2.7 Creating a Text File
2.8 Basic Terms
2.9 The toolbox
2.10 Page and Pasteboard

Chapter 3: Adventures with CorelDraw 10

3.1 Standard Tool Bar
3.2 Handling Shapes using the property Bar
3.3 Rotating Objects
3.4 Lines and Arrows
3.5 Page and Document Setup
3.6 Rulers, Guidelines and grid
3.7 Using Dockers window
3.8 Using Test
3.8.1 Artistic Test
3.8.2 Paragraph Test
3.8.3 Formatting Text
3.9 Using Help
3.10 Printing a Drawing
3.11 Arrangement of Objects
3.12 Using the Library of Clip Arts and Bitmap Image
3.13 Fun with the Artistic Media Tool
Part III: Color Plates

Part IV: Photoshop 7

Chapter 4: The Exciting Photoshop 7

4.1 Welcome to Photoshop 7
4.2 Opening an Image
4.3 Saving an Image
4.4 Closing an Image and Shutting Down Photoshop
4.5 Creating a new Image
4.6 Using the toolbox
4.7 Tool Options Bar

Chapter 5: More fun with Photoshop 7

5.1 Using Layers
5.1.1 The Layers Palette
5.1.2 Adding a new Layer
5.1.3 Hiding a Layer
5.1.4 Renaming a Layer
5.1.5 Removing or deleting a layer
5.1.6 Merging Layers
5.1.7 Copy and Paste with Image
5.1.8 Flattening the Image
5.2 Seeking Help
5.3 Paths for saving Selection
5.4 Fascinating Colors
5.4.1 Various Colors model
5.4.2 The Colors Pickers
5.4.3 The Colors Palette
5.4.4 The Colors Swatches Palette
5.4.5 ICC (inter- Color Consortium)
5.5 Inserting Test and Image
5.6 Printing Image
5.7 Filters to Improve the Image

Part V: PageMaker 7

Chapter 6: The Marvelous Page Maker 7

6.1 Why PageMaker?
6.2 Creating a new publication in PageMaker 7
6.2.1 Starting PageMaker 7
6.2.2 The dialog Boxes Document Setup and save Publication
6.2.3 Closing the publication and Shutting PageMaker
6.3 The Dialog Box Open Publication
6.4 Text Blocks
6.4.1 Drawing a Text Block by dragging the mouse-cursor
6.4.2 Empty Test Blocks are Deleted Automatically
6.4.3 Creating a Test Block by a Mouse click
6.4.4 Fitting Test Blocks on a page
6.4.5 Inserting Pages While Placing Test
6.5 Handling Pages
6.5.1 Inserting Page
6.5.2 Deleting Page
6.5.3 Go to the desired page
6.6 Flow of Text in linked Text Blocks
6.7 Using the Toolbox

Chapter 7: The Power of PageMaker 7 Unleashed

7.1 Using the Tool Bar
7.2 Importing Text
7.3 Manual Semi-automatic and Automatic Test Flow
7.4 Importing Picture
7.5 Wrapping Text around pictures
7.6 Character Level Formatting
7.7 Paragraph Level Formatting
7.8 Opening Multiple Publication Windows
7.9 Using Story Editors
7.9.1 Editing and Existing Story
7.9.2 Creating a new Story
7.9.3 Using Story Editor Effectively
7.10 Spelling, Find, and Change
7.10.1 Checking Spelling
7.11.1 Dialog Boxes Find Change
7.11 View, Page, and Pasteboard
7.12 Grouping and Arranging
7.13 Using Styles
7.13.1 Using the Predefined Styles
7.13.1 Creating a new Style
7.13.2 Using Styles Effectively
7.14 Using the Document master pages
7.14.1 Why Use Master Page
7.14.2 Numbering Pages
7.15.3 Creating the Sample Publication Nature
7.15 Sample Publication
7.16 Printing and Color Separation

Chapter 8: A quick tours of QuarkXPress, MS Publisher, Corel VENTURA, and Adobe Illustrator

8.1 A Quick Tour of QuarkXPress 4.0
8.1.1 Creating a new Document
8.1.2 Saving a Document and Creating a Template
8.1.3 Closing and Opening a Document Shutting QuarkXPress
8.1.4 Using the Tools Platte
8.1.5 Creating and Linking Text Boxes
8.1.6 Importing Text
8.1.7 Importing Pictures
8.1.8 Resizing and Relocating Boxes
8.1.9 Formatting Text
8.2 Quick Tour of MS Publisher 2000
8.3 Quick Tour of Corel VANTURA 5.0
8.4 Quick Tour of Adobe Illustrator 9.0
8.5 Generic Tips for DTP Professional

Latest Interior Design Syllabus after 12th (2022 - 2023)

Interior Design Course in Goa India

Here is the List of Complete Course Details that you can learn to Became a good Interior Designer in our Goa Office, India. 
Autocad Course Training Institute at #11 ,M.N.F heights, Above Paulo Travels, 
Opp K.F.C,Near Ktc Bus Stand, Margao, Goa, PIN : 403601
Click here JOIN The COURSE NOW


Join the DIPLOMA IN INTERIOR DESIGN Course by Registering online here
DIPLOMA IN INTERIOR DESIGN (D.I.D.) (ONE YEAR)
Course/ Syllabus

Home Interior Design Goa India

Diploma in Interior Design

  1.  Name of the Course :-Diploma in Interior Design
  2. Eligibility :- 10+2
  3. Duration :- One Year (Full Time)
  4. Course Timing :- Monday to Saturday
  5. Medium of Teaching :- Hindi / English.

Admission Procedure :- By written and oral Exam.
Semester wise Interior Design Course
Diploma In Interior Design
Marks
Sl. No. Paper Code Paper Name External Internal Total Marks
1ST SEMESTER
1 DID-101 Residential Interior Space Design 75 25 100
2 DID-102 Building Materials - I 75 25 100
3 DID-103 Drawing and Graphics 75 25 100
4 DID- 104 Commercial Interior Space Design Design – 75 25 100
5 DID-105 Project - I -Residential Interior Space Design – 75 25 100
2ND SEMESTER
6 DID-106 Project - II -Commercial Interior Space Design – 75 25 100
7 DID-107 Building Services - I 75 25 100
8 DID-108 Professional Practice-I 75 25 100
9 DID-109 Practical – I Drawing and Graphics 75 25 100
10 DID-110 Practical – II Building Construction 75 25 100
Total 1000

Detailed Syllabus for PG Diploma (DID) - Interior Design


 Interior Designing Course Goa


1. Residential Interior Space Design (Marks 100) Paper Code – DID-101
Residential Interior Space Design

Unit No. 1: Introduction of Design
Unit No. 2: Elements of Design
Unit No. 3: Principles of Design
Unit No. 4: Introduction of Interior Design
Unit No. 5: Standard Dimensions of Living Room Furniture Unit No. 6: Dining Area Furniture
Unit No. 7: Bedroom Furniture
Unit No. 8: Kitchen Furniture
Unit No. 9: Bathroom / Toilet (Sanitary Wares)
Unit No. 9: Measurement Plan
Unit No. 10: Bubble Diagram and Furniture Layout
Unit No. 11: Interior Elevations of Walls
Unit No. 12: Planning of Living Room
Unit No. 13: Planning of Dining Area
Unit No. 14: Planning of Bedroom
Unit No. 15: Planning of Kitchen
Unit No. 16: Planning of Bathroom
Unit No. 17: Planning of the Circulation Space
Unit No. 18: Flooring Layout
Unit No. 19: False Ceiling
Unit No. 20: Electrical Layout
Unit No. 21: Room Orientation

2. Building Materials - I (Marks 100) Paper Code – DID-102

Unit No. 1: Brick:
Qualities of good brick, Field test, Terminology, Precautions to be taken in bricklaying & size.
Unit No. 2: Stone:
Classification, Qualities of good stone Laying Dressing Different textures and applications.
Unit No. 3: Sand:
Types and application
Unit No. 4: Timber:
Types, Cross sections of exogenous tree Defects in timber, Seasoning, Application in interior, Application of artificial timber e.g. veneers plywood.
Unit No. 5: Cement:
Types, Field test for cement Application of cement
Types Application
Unit No. 6: Lime:
Types Application, Application in Interior Design
Unit No. 7: Concrete:
Types Application, Precautions to be taken in handling and transportation.
Unit No. 8: Glass:
Types Applications of glass in various interiors.
Varnishes: Types and applications in various interiors.
Unit No. 9: Hardware:
Types and application

3: Drawings and Graphics (Marks 100) Paper Code – DID-103

Unit No. 1: Draftsman ship
1. Introduction to Draftsmanship
2. Need for training, duties determining needs and wishes of the client
3. Relationship between two-dimensional and three dimensional diagrams

Unit No. 2: Drafting Tools and techniques

1. Introduction of drawing table and boards, How to handle – handling paper and pencil.
2. Types of scales, Tools for curves and irregular forms – Drawing aids.
3. Drafting mediums – Tracing papers, tracing cloth, watercolor paper, sketch
Paper, vellum and polyester film
Unit No.3: Basics of Drawing

1. Measurements
2. Lines – Types of lines and lines thickness
3. Lettering – Single stroke letter, Gothic letters.
4. Dimensioning – Types of dimensioning, different types of dimensioning lines
5. Drawing and drawing methods
6. Geometrical figures
7. Structural symbols, window and door symbols.
8. Plumbing symbols and electrical symbols.

Unit No. 4: Architectural Drawing


Architectural Drawing Interior Designing Course Goa

1. Orthographic and isometric Projection
2. Perspective Projection – one point and two point Free Hand
3. Sciography – Shades and Shadow of objects, Presentation Techniques
4. Rendering and Colouring
5. Presentation Drawing, Perspective Projection

4: Commercial Interior Space Design Portfolio & Viva Voce (Marks 100) Paper Code – DID-104

Commercial Interior Space Design  by CAD CAM Centre  Goa
Unit No. 1: Introduction to design
Unit No. 2: Standard dimensions of office furniture
Unit No. 3: Waiting area furniture
Unit No. 4: Office table computer work furniture
Unit No. 5: Staff cabin furniture
Unit No. 6: Office files storage and cabinets
Unit No. 7: Common areas
Unit No. 8: Main cabins
Unit No. 9: Conference room
Unit No. 10: Pantry area
Unit No. 11: Canteen
Unit No. 12: WCs
Unit No. 13: Store room
Unit No. 14: Planning of the circulation space
Unit No. 15: Planning of office

5: Residential Interior Space Design- Project -I (Marks 100) Paper Code – DID-105

Residential Interior Space Design  by CAD CAM Training Center Goa
Unit No. 1: Design brief
Unit No. 2: Picture board - 3
Unit No. 3: Principles of Design – 3 sheets
Unit No. 4: Measurement Plan-1
Unit No. 5: Civil Changes layout -1
Unit No. 6: Bubble diagram – (5 sheets)
Unit No. 7: Concept of Design (write-up)
Unit No. 8: Furniture layout
Unit No. 9: Elevation – (12 Sheets)
Unit No. 10: Flooring layout
Unit No. 11: Reflected False ceiling layout
Unit No. 12: Electrical layout
Unit No. 13: Plumbing layout
Unit No. 14: A/C layout
Unit No. 15: Perspective – (10 Sheets)
Unit No. 16: Perspective of external facade
Unit No. 17: Material Chart
Unit No. 18: Estimate
Unit No. 19: Model

6: Commercial Interior Space Design- Project - II (Marks 100) Paper Code – DID-106
Commercial Interior Space Design in Goa

Unit No. 1: Design brief
Unit No. 2: Picture board - 3
Unit No. 3: Principles of Design – 3 sheets
Unit No. 4: Measurement Plan-1
Unit No. 5: Civil Changes layout -1
Unit No. 6: Bubble diagram – (5 sheets)
Unit No. 7: Concept of Design (write-up)
Unit No. 8: Furniture layout
Unit No. 9: Elevation – (12 Sheets)
Unit No. 10: Flooring layout
Unit No. 11: Reflected False ceiling layout
Unit No. 12: Electrical layout
Unit No. 13: Perspective – (10 Sheets)
Unit No. 14: Material Chart
Unit No. 15: Estimate
7: Building Services - I (Marks 100) Paper Code – DID-107
Unit No. 1: Sanitary Fixtures and Fittings
Unit No. 2: Building Drainage System
Unit No. 3: Acoustics
Unit No. 4: Air Conditioning
Unit No. 5: Termite proofing, waterproofing

8: Professional Practice - I (Marks 100) Paper Code – DID-108
Unit No. 1: Estimate
Unit No. 2: Office letter writing
Unit No. 3: Role of Designer
Unit No. 4: Role of Indian Institute of Interior Designers
9: Drawing and Graphics – Practical -I (Marks 100) Paper Code – DID-109
Note: The Portfolio should cover sheet from all the chapters mentioned below:

Unit No. 1: Draftsman ship
1. Introduction to Draftsmanship
2. Need for training, duties determining needs and wishes of the client
3. Relationship between two-dimensional and three dimensional diagrams

Unit No. 2: Drafting Tools and techniques
1. Introduction of drawing table and boards, How to handle – handling paper and pencil.
2. Types of scales, Tools for curves and irregular forms – Drawing aids.
3. Drafting mediums – Tracing papers, tracing cloth, watercolor paper, sketch
Paper, vellum and polyester film.

Unit No. 3: Basics of Drawing
1. Measurements
2. Lines – Types of lines and lines thickness
3. Lettering – Single stroke letter, Gothic letters.
4. Dimensioning – Types of dimensioning, different types of dimensioning lines
5. Drawing and drawing methods
6. Geometrical figures

Unit No. 4: Architectural Symbols
1. Structural symbols, window and door symbols.
2. Plumbing symbols and electrical symbols.

Unit No. 5: Architectural Drawing
1. Orthographic and isometric Projection
2. Perspective Projection – one point and two point Free Hand
3. Sciography – Shades and Shadow of objects, Presentation Techniques
4. Rendering and Colouring
5. Presentation  Drawing, Perspective Projection
10: Building Materials - Practical - II (Marks 100) Paper Code – DID-110
(Click here JOIN The COURSE NOW)

Unit No. 1: Brick:
Qualities of good brick, Field test, Terminology,
Precautions to be taken in bricklaying & size.

Unit No. 2: Stone:
Classification, Qualities of good stone Laying Dressing Different textures and applications.
Types and application

Unit No. 3: Timber:
Types, Cross sections of exogenous tree Defects in timber, Seasoning, Application in interior,
Application of artificial timber e.g. veneers plywood.

Unit No.4: Cement:
Types, Field test for cement Application of cement

Unit No. 5: Lime:
Types Application
Application in Interior Design

Unit No. 6: Concrete:
Types Application precautions to be taken in handling and transportation.

Unit No.7: Glass:
Types Applications of glass in various interiors.
Varnishes: Types and applications in various interiors.

Unit No. 8: Hardware:
Types and application

What is the eligibility for interior designing courses?
The eligibility required for interior design course is at least completed 10+2. 
Join the DIPLOMA IN INTERIOR DESIGN Course by Registering online here

We have Started the ETABS Courses in Goa with the Aim to provide Best Structural Design Learning for the Students in Civil Engineering allied streams.

ETABS Program Description Objective, ETABS menu commands, Time Saving Options, Templates and Defaults, Basic process, Forms.


ETABS “Screen”

The ETABS Window, Main title Bar, Menu Bar, Toolbars and Buttons, Model Explorer, Display Windows, Display Title Tab, Status Bar, Working Plane Drop-Down List, Mouse Pointer Position Coordinates, Drawing & Selection Drop- down List, Coordinate System Drop-Down List, Currents units, file operation, edit, view, define, draw, select, assign, analyze, Display, design, detailing, options.

Basic modes, Drawing tools, mouse pointers
Objective, select or draw.

Begin a model
Objective, create the basic grid system, grid dimensions( Plan)- Define a grid system, story dimensions- define story data.

ETABS Course Certification Goa for CIVIL Students
Create the structural model
Objective, and structural objects using templates, define properties, material properties, frame sections, auto selection list, add structural objects manually, draw beams, draw secondary ( infill ) beams, Draw the Floor, Draw walls, Draw wall stack. 

Select structural objects
Objectives, selecting, graphical selection options, selecting by coordinates, selecting by features, deselect command, invert selection command, get previous selections commands.

Assign/Change Properties
Objective, assign the AUTOLATBM, Auto select selection list, make an assignment as the object is drawn, make an assignment using the model explorer.

Load the structural model
Objective, Structural loads, define the load patterns, auto lateral load, self-weight multiplier, modify an existing load pattern, delete an existing load pattern, define shell uniform load sets, assign structural loads.

Define load cases
Objective, Review/create load cases

Edit the model Geometry
Objective, editing options,

Analyze the model
Objective, set the mesh options, model analyses, model alive feature, locking and unlocking the model.

Design
Objective, design the structure.

Detailing
Objective, detailing process, references, rebar selection rules, start detailing, edit views, create and manage drawing sheets,

Display results
Objective, Obtain basic graphical displays, graphical displays using model explorer, tabular display of results, generate results, Objective, summary report, print graphics, export results.

Register Online Free by Submitting your basic Details for AutoCAD Course in Margao, Goa. You will be Provided with all the Details in this Website on all the CAD CAM Courses and there Duration.

 Register for CAD Courses in Goa

3D Max Course Training in Goa Institute

AutoCAD Course Training 2018 in Goa for Students and Proffesionals